I have often encountered situations where Windows could not remove installed printers. A printer may not appear in the Windows Control Panel (but it may be available in the Print dialog box in all applications), or you may get various errors when you try to remove a printer (no access, the printer port is in use, a print queue error, etc.). In this article, we’ll look at how to completely remove a printer on Windows 10 and 11.
How to Properly Remove a Printer on Windows
First of all, there are the standard Windows printer removal methods, which you should try:
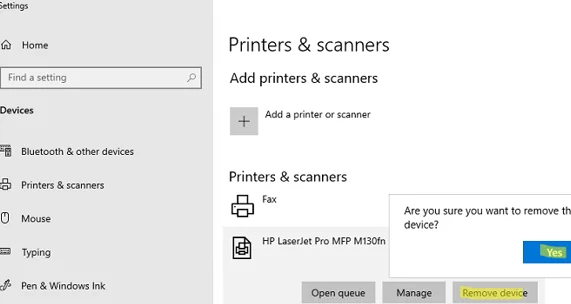
- Open Settings -> Devices -> Printers and Scanners (or run a quick access URI command:
ms-settings:printers); - Select a printer you want to remove and click Remove Device;
- Confirm the printer removal.
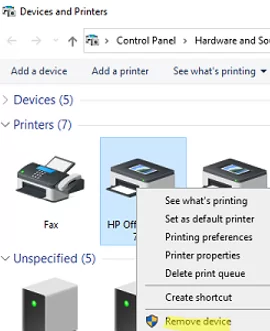
You can also remove a printer from the classic Windows Control Panel:
- Run the command:
control /name Microsoft.DevicesAndPrinters - Select a printer from the list and click Remove Device.
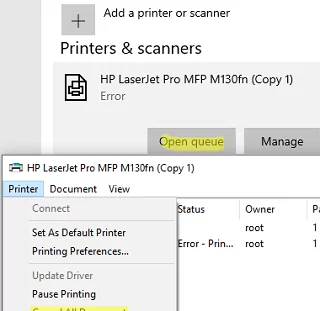
Note that if there are active tasks in the print queue, you won’t be able to uninstall the printer until you clear the print queue. To do it, locate the printer in the Control Panel and select Open queue. Then click Printer -> Cancel All Documents.
Try to remove the printer after you clear the print queue.
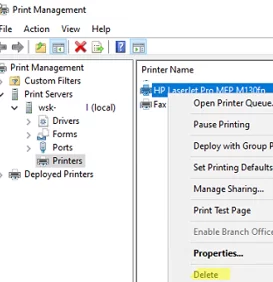
You can use the Print Management MMC snap-in to remove a printer (it helped me remove a printer that was not showing up in the Windows Control Panel several times).
- Open the console using the command:
printmanagement.msc - Navigate to Print Manager -> Print Servers -> select your computer -> Printers;
- Select your printer and click Delete in the context menu.
List installed printers:
cscript "C:\Windows\System32\Printing_Admin_Scripts\en-US\prnmngr.vbs" -l
Remove a specific printer:
cscript "C:\Windows\System32\Printing_Admin_Scripts\en-US\prnmngr.vbs" -d -p "HP LaserJet Pro MFP M130"
Or you can use the built-in PowerShell module to uninstall a printer:
Remove-Printer -Name "HP LaserJet Pro MFP M130"
Can’t Remove the Printer in Windows: How to Force Uninstall
If for some reason a printer is not displayed in the Control Panel, or you cannot remove it due to an error, you can force it to be removed.
The first step is to clear the print queue by using the commands:
net stop spooler
 del %systemroot%\system32\spool\printers\*.shd /F /S /Q
 del %systemroot%\system32\spool\printers\*.spl /F /S /Q
 net start spooler
%systemroot%\system32\spool\printers directory.Then you may delete a printer entry from the Windows registry:
- Open
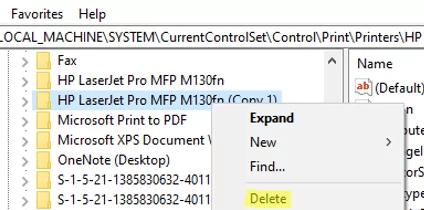
regedit.exe; - Go to HKEY_LOCAL_MACHINE\SYSTEM\CurrentControlSet\Control\Print\Printers;
- Find the registry sub-key with the name of your printer (in my example, it is
HP LaserJet Pro MFP M130fn (Copy 1); - Delete the registry key for the printer;
- Restart your computer and make sure that the printer has disappeared from the Control Panel. If it is still displayed, but its status has changed to Not Connected, just remove it.
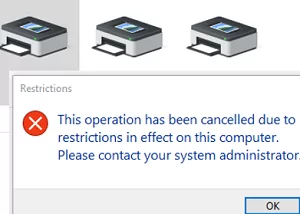
You may receive the following error message when removing a printer:
This operation has been cancelled due to restrictions in effect on this computer. Please contact your system administrator.
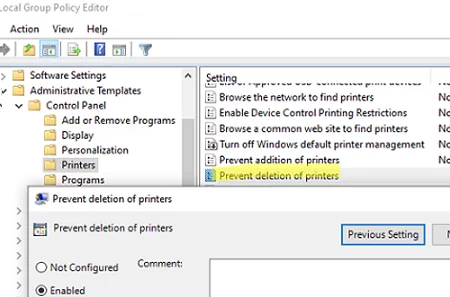
In this case, check that the Group Policy option preventing printer removal is enabled (Prevent deletion of printers). It can be found in the User Configuration –> Administrative Templates –> Control Panel –> Printers section of the Local Group Policy Editor (gpedit.msc).
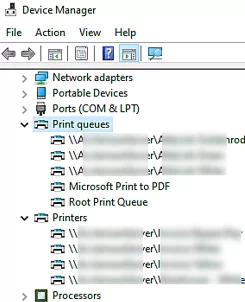
If the policy is disabled or not configured, you will need to remove hidden printers and print queues using the Device Manager. This problem often occurs with shared network printers.
- Open the Device Manager (
devmgmt.msc); - Enable View -> Show hidden devices;
- Expand Print queues and Printers sections and remove any printers you do not need.
Remove or Uninstall a Printer Driver on Windows
When you remove a printer from the Control Panel, its drivers remain in the Windows Drive Store. You can clean up the Drive Store by removing the unused printer drivers from your computer:
- Open the
services.mscconsole and restart the Print Spooler. You may restart the service using PowerShell:Restart-Service spooler -Verbose - Open the Print Management snap-in:
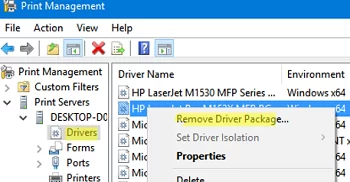
printmanagement.msc; - Expand Print Manager -> Print Servers -> select your computer -> Drivers;
- All installed printer drivers are displayed in the list;
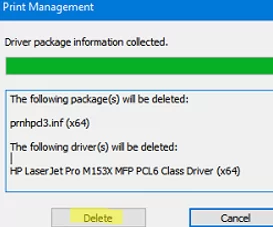
- Right-click the driver you want to uninstall and select Remove driver package;
- Confirm the removal of the driver, its inf file, and any associated files.
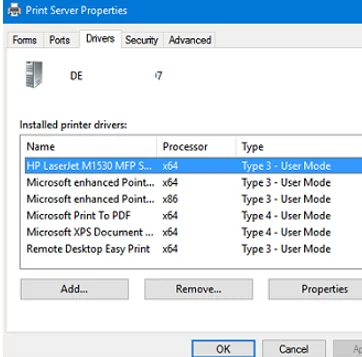
You can also remove unnecessary drivers from the Print Server Properties. To do this, run the printui /s /t2 command, select the printer driver, and click Delete.
3 comments
Thank you so much you gave me so much information today I have spent months on this going from forum to forum to forum and absolutely never a reply and reading endlessly on the web without resolve .
I have a windows 732 bit I am constantly bothered by нет fxutil and fxsapi….. errors on my machine I realized that when windows 7 was new that faxes were a thing of the current but they are now a thing of the past and I have uninstalled my fax months ago and I still have these errors I have tried to dlsm and I have the accurate version but that throws errors too.
🔷🔷 I would sure love some guidance to get rid of these 2 errors without doing a clean install or a repair install I’m not ready for that I’ve spent months and hours on this already I would just love to know how to go into the registry back it up and then delete the references that point to the fax printers thank you so much and God bless
Thank you for all your valuable informations!
Small typo in the registry key:
HKEY_LOCAL_MACHINE\SYSTEM\CurrentControlSet\Control\Print\Printes
should be
HKEY_LOCAL_MACHINE\SYSTEM\CurrentControlSet\Control\Print\PrinteRs
Thank you, fixed!